Installing Citrix For Windows
Preparing Your System
-
Ensure that no local drives are assigned the letters R:, M:, or X:. These drive names will be used to save files within your hosting environment. See How To Save Files for details.
- Log into your system using an administrator account.
-
Add https://www.senior-anywhere.com to your Trusted Sites list in Internet Explorer:
- From the Tools menu, select Internet Options.
- Select the Security tab.
- Select the Trusted Sites zone, then click Sites to view/add/edit sites on your trusted sites list.
|

|
IMPORTANT: This step is necessary even if you plan to use a different browser, such as Firefox or Netscape. |
-
Make sure that an older version of the Citrix web client is NOT already installed. If you have an outdated Citrix client already installed, you must uninstall it before installing the Citrix Receiver.
To uninstall:
- From your Control Panel, open the Add/Remove Programs or Uninstall or Change a Program tool.
- Look for the outdated Citrix client program in the list.
- If an outdated client is not in your list, you can close the window and proceed to installation. Otherwise, click to select it for removal.
- If prompted, click Remove and proceed with the uninstall process.
- Restart your computer.
- Before proceeding with installation, check your program list to confirm that the program is no longer installed.
|
Installation
You can download and install the latest version of the Citrix Receiver client directly from https://www.Senior-Anywhere.com. When you navigate to the site, you will be prompted to install the Citrix client if it is not already present on your computer.
-
Make sure you are still logged into your system using an administrator account and that you have disabled any pop-up blockers and anti-virus software.
-
Navigate to https://www.Senior-Anywhere.com. If the Citrix Receiver client is not already installed on your computer, you will see a green Install button. Click the checkbox beside 'I agree with the Citrix license agreement', then click Install.

-
Your browser will prompt you to 'Run' or 'Save' the installation file. In most cases, click Run.

|
Note:
If your security settings prevent the site from opening or block the Citrix client detection software from running, you may need to add https://www.senior-anywhere.com to your browser's Trusted Sites or Security Exceptions list. |
-
You will see a pop-up when installation is complete:

-
You will then be able to log into https://www.Senior-Anywhere.com with your Citrix credentials, and access your school's Ascendance applications.

-
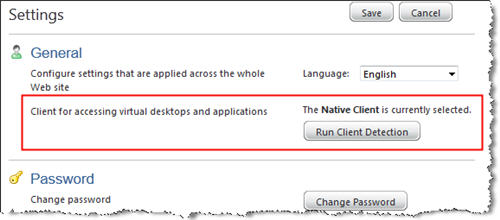
Verify that the default web browser is set to Native Client:
- From the landing page, click
 Settings. Settings.
- Verify that 'Client for accessing virtual desktops and applications' is set to Native Client.
- If not, click Run Client Detection and follow the system prompts to select/install the native client.
-
Click Save if you make any changes. Otherwise click Cancel to return to the landing page.
|
|
|
IMPORTANT: DO NOT FORGET to re-set any anti-virus or other security software that you may have disabled, after installation is complete. |
Downloads
 Cloud Services User Guide (for End User)
Cloud Services User Guide (for Sys Admin)
Senior Systems Product Support
Toll-Free: 888-480-0102, option 1
Email: support@senior-systems.com
https://www.Senior-Systems.com